
So, I did some internet searching and have been inspired with some great ideas; some incorporated the rapunzel's tower, some a frying pan, but all with the signature Rapunzel: her golden long hair. Well, our invite includes long hair (golden yellow embriodary string) and a lot, I mean A LOT of braiding! I used 12 strands of golden string for each invite and braided for hours.

I even managed to do a few nursing sessions with Indigo WHILE braiding -talk about multi-tasking! I figured this would be a great opportunity to teach Madi to braid, but she' more interested in glueing and drawing princesses. I wanted to include her in making the invites, but also wanted them to be amazing. Tough one. So, she was in charge of cutting the purple ribbon for Raunzel's hair and drawing princesses on the envelopes.
The invite idea is a window with Rapunzel's hair coming down. "Rapunzel, Let down your hair!" is just about the most famous line of Rapunzel's. I tried at first to do a cut-out square on the top, but my square puncher was just too big and it didn't really look like a window; just a big square hole. I knew I needed something smaller, so I transformed a "house" puncher to look like a window and ended up not doing a "hole" window, but making black cardstock to look like the window, punch a small hole in it and put the braid through that so it looked like it was coming out of the window.
i hot glued that down to the card and there it is! After a few were made, my son thought it didn't look like a window, so I added "shutters" to the last ones. So here's the finished invitation.

To make this invitation, you will need:
lavender cardstock 4.5 X 6.5
black or brown cardstock
yellow or golden embroidary string
purple ribbon
yellow or golden embroidary string
purple ribbon
glue gun
tape
- Print or write with fun pen your text first. Leave some space on top & try to get it aligned to the right, so you will have room for the braid to come down without interfering with the text. We used "High Tower" font, not that anyone will know the font, but I thought it was significant.
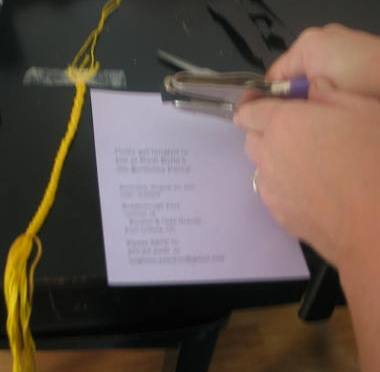
- For each braid, cut 12 pieces about 10 inches long. Tie the top together and tape it to something so it's taut enough to braid or if you have a patient little birthday girl, have her hold the end as you braid. (we tried that but she got bored haf way through the first braid!)
- Separate into 3 strands of 4 strings each. You can use more if you want a thicker braid.
- Braid away!
- I tied of the end with itself, so it would stay put. Then tie it off with a small piece of purple ribbon. Cut the end even.
- Cut out your window with the black or brown using a square puncher. or if you want to just cut a square through the invite itself, you can make a cool window that way too.
- Punch a small hole in the window, put the top of the braid through and hot glue it down to the top of the invite. I also put a small dot of hot glue to bring the hair a little to the right to avoid the text and have it fall nicely.
- I added shutters to mine, per request of my 10-year-old son, by using some brown cardstock I had from a previous project. I drew with a pencil on it a small brick effect. cut them by hand to make it look like shutters and hot glued those down on either side of the window.
There you have it!
No comments:
Post a Comment